Advanced security settings
Set up your system wide security settings and password requirements. Choose your login type, add IP restrictions, and manage your logins and devices.
By using the advanced security settings, you can set up system wide settings which will affect all of your users. To start, click the settings gear from any system page and then open the Security tab. Below you’ll find explanations for all the different options under this tab.
Login
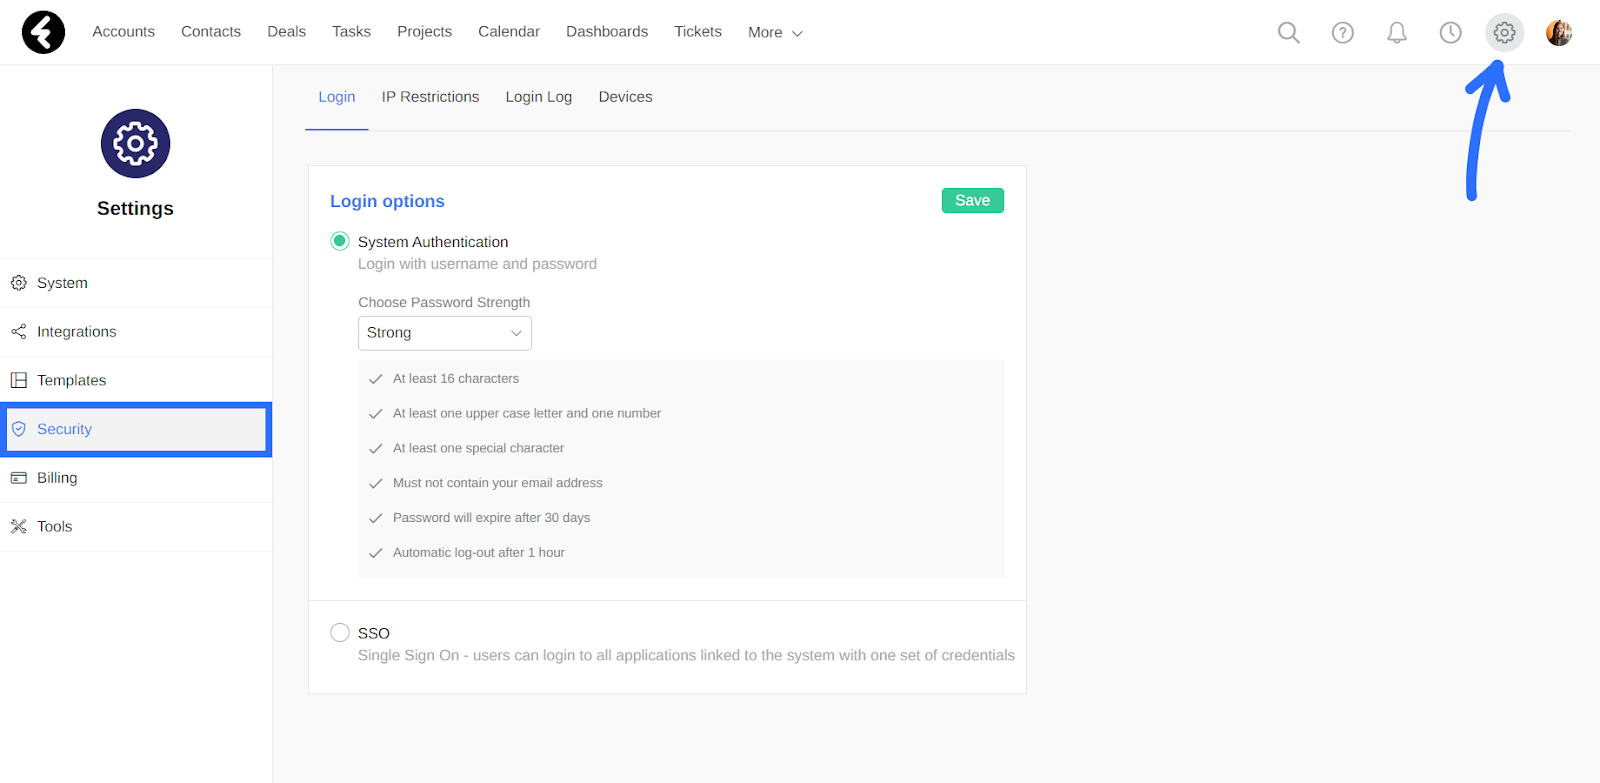
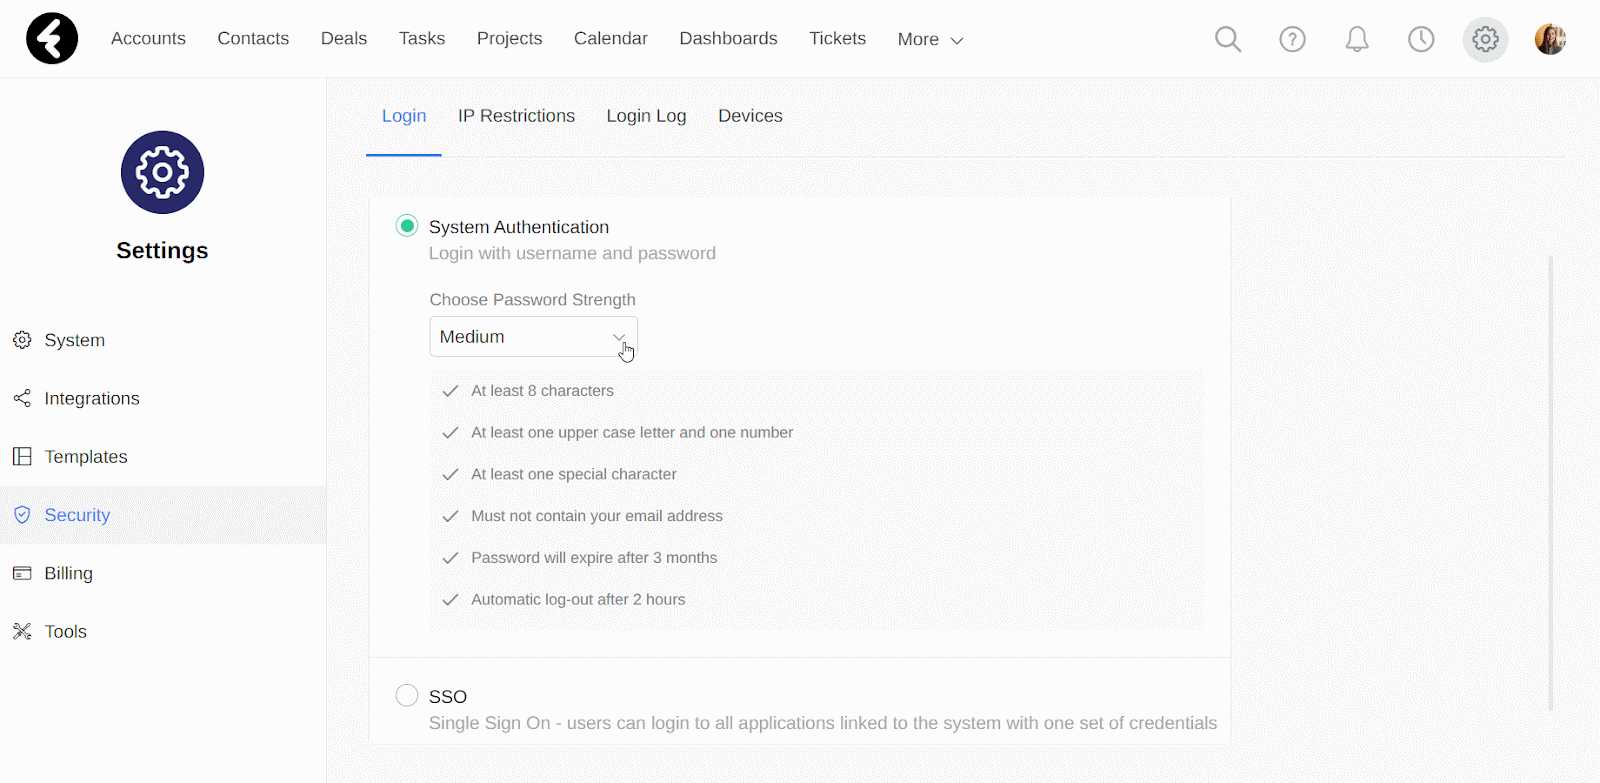
In the login section, first select one of the login options. Click the circle next to System Authentication if you’d like your users to sign in via usernames and passwords. You can also select the SSO option, which will instead have your users use one set of credentials to sign into all the different applications you use. This will increase the overall security level of your system.
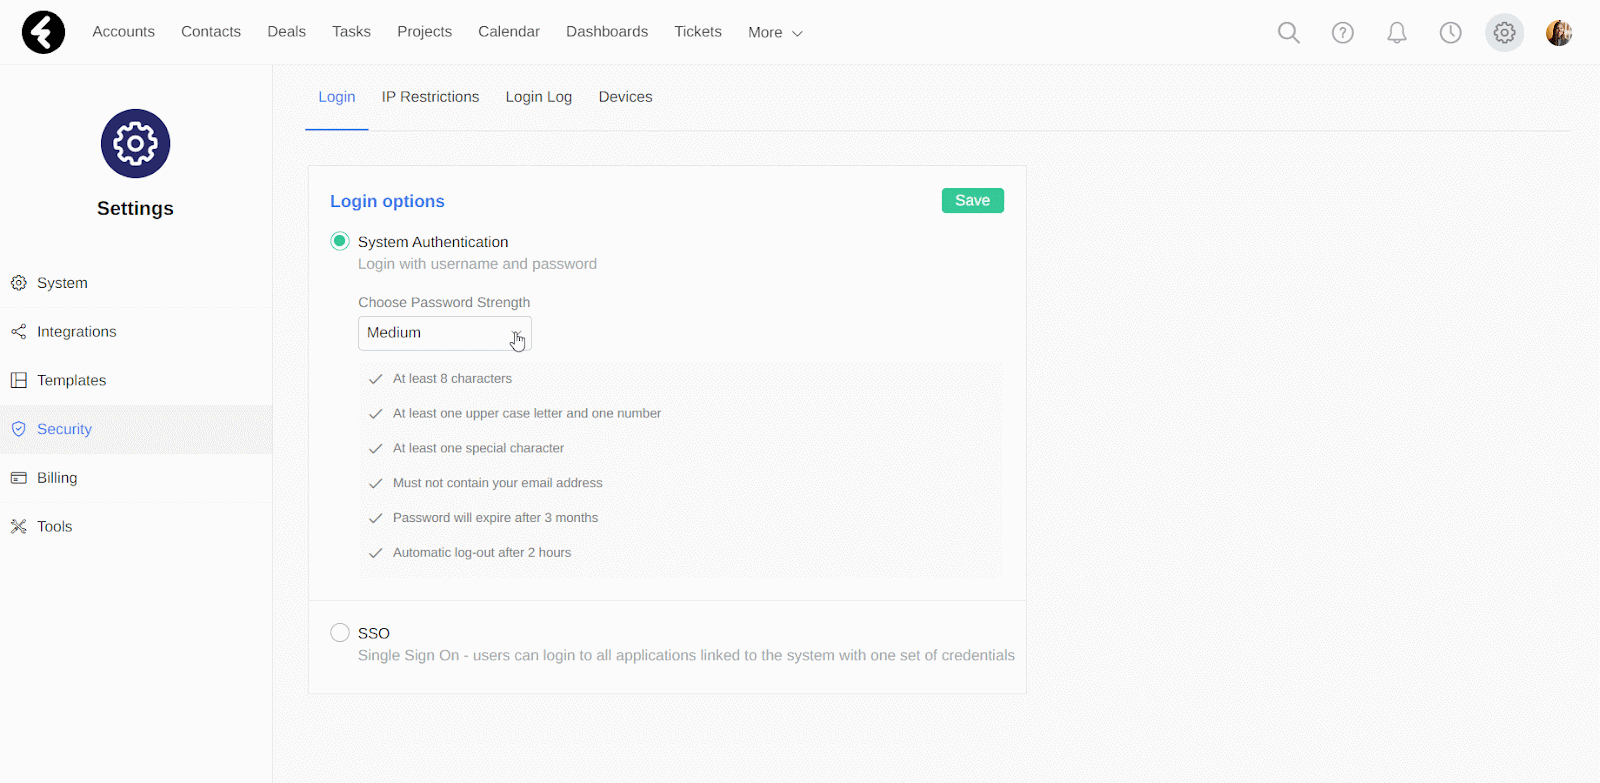
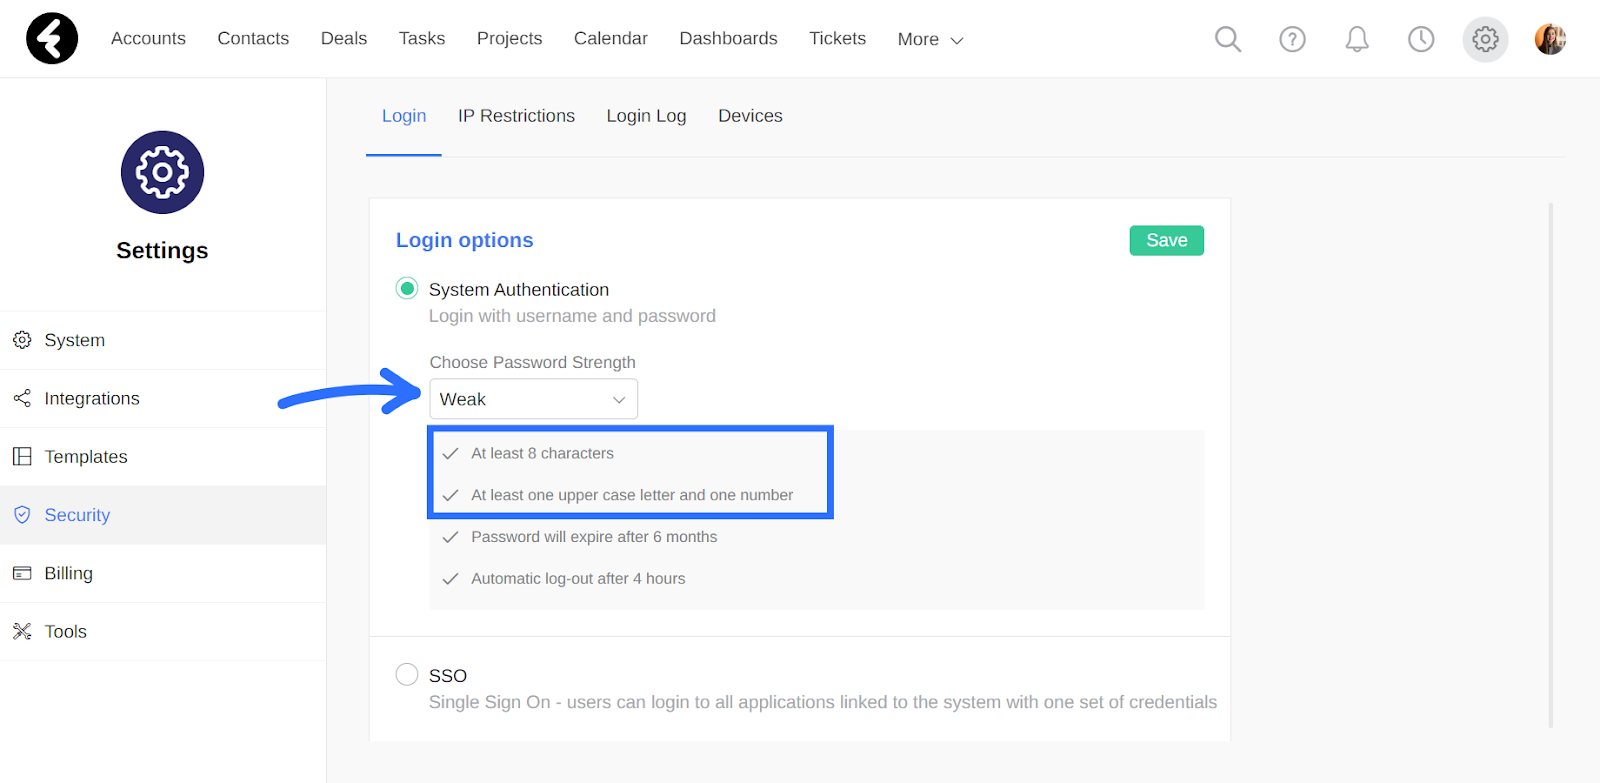
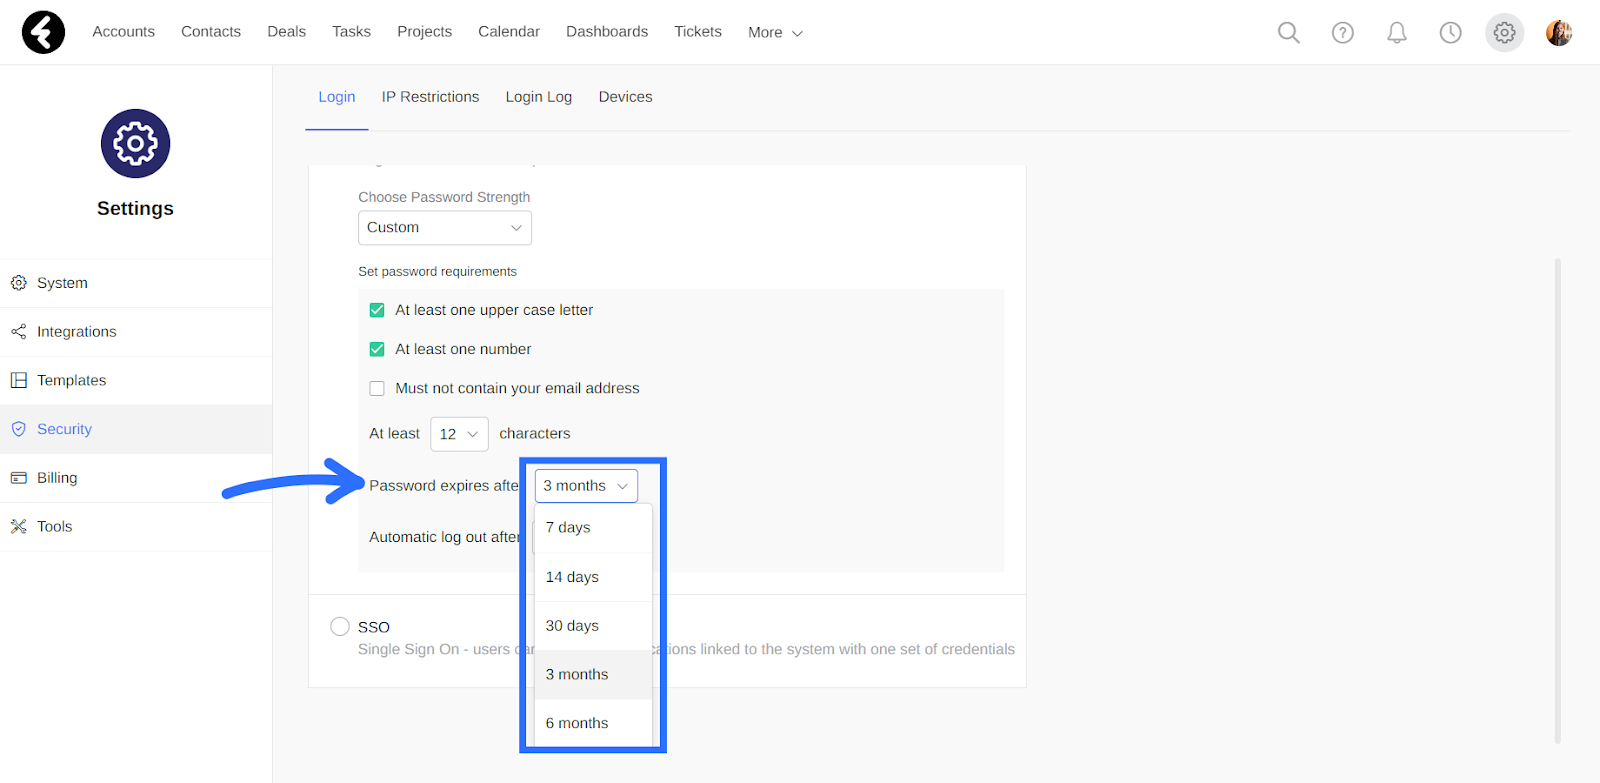
Under the System Authentication option, you’ll find the Choose Password Strength option. Here you can either select one of the three prebuilt options, Strong, Medium, and Weak, or you can create your own password rules using the Custom option. After selecting an option, its details will be displayed. The first section of the list will always contain the password rules, while the last two will set the password expiration and automatic logout. Each section will be explained in detail below. After selecting an option, be sure to click Save.
Password requirements
The strength of a password is generally determined by its length and complexity, meaning the number of uppercase or lowercase letters, numbers, and unique characters it contains. By selecting one of the built-in options, these requirements will be preset based on the list displayed in the system. For example, by selecting the Weak option, you’ll see that it will require passwords to have at least eight characters, one uppercase letter, and one number. The Medium and Strong options will add on to these with additional requirements.
By selecting the Custom option, you can instead manually set the following password requirements:
- At least one uppercase letter: Check this option to require at least one uppercase letter in each password.
- At least one number: Check this option to require at least one number in each password.
- Must not contain your email address: Check the option to ensure that passwords will never contain the user’s email address.
- At least __ characters: Use the dropdown here to select the minimum number of characters for each password. The minimum is eight and the maximum is 60.
Password expiration
Under the password requirements, you’ll find the Password will expire after option. This will set the length of time from when a password is set in the system until it will need to be reset by the user. For example, if you select the Medium strength option, system passwords will expire after three months. In the Custom option, you can use the Password expires after dropdown to select between 7 days, 14 days, 30 days, 3 months, and 6 months.
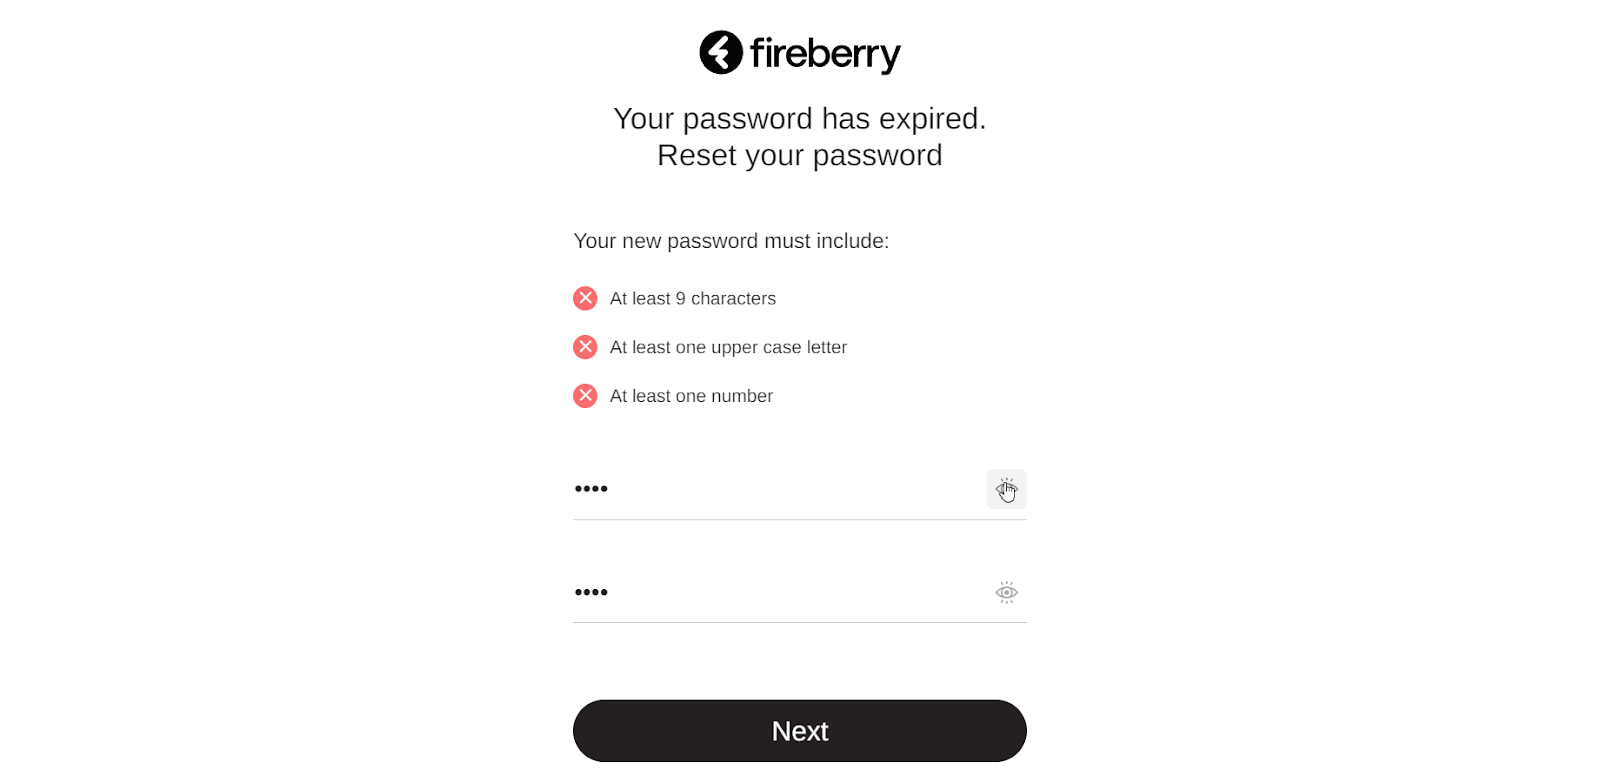
If your password has expired, you won’t be able to login to the system, and will instead be brought to the Reset your password page. Here you can type your new password into the New password section. You’ll see the requirements which are set in your system for your password above it. After typing in a password, each requirement will have a green check or an X next to it, depending on if you’ve fulfilled the requirement. In the picture below, there is an X next to the At least one number requirement, as this password does not contain at least one number. In this way you can easily make sure you follow all the requirements.
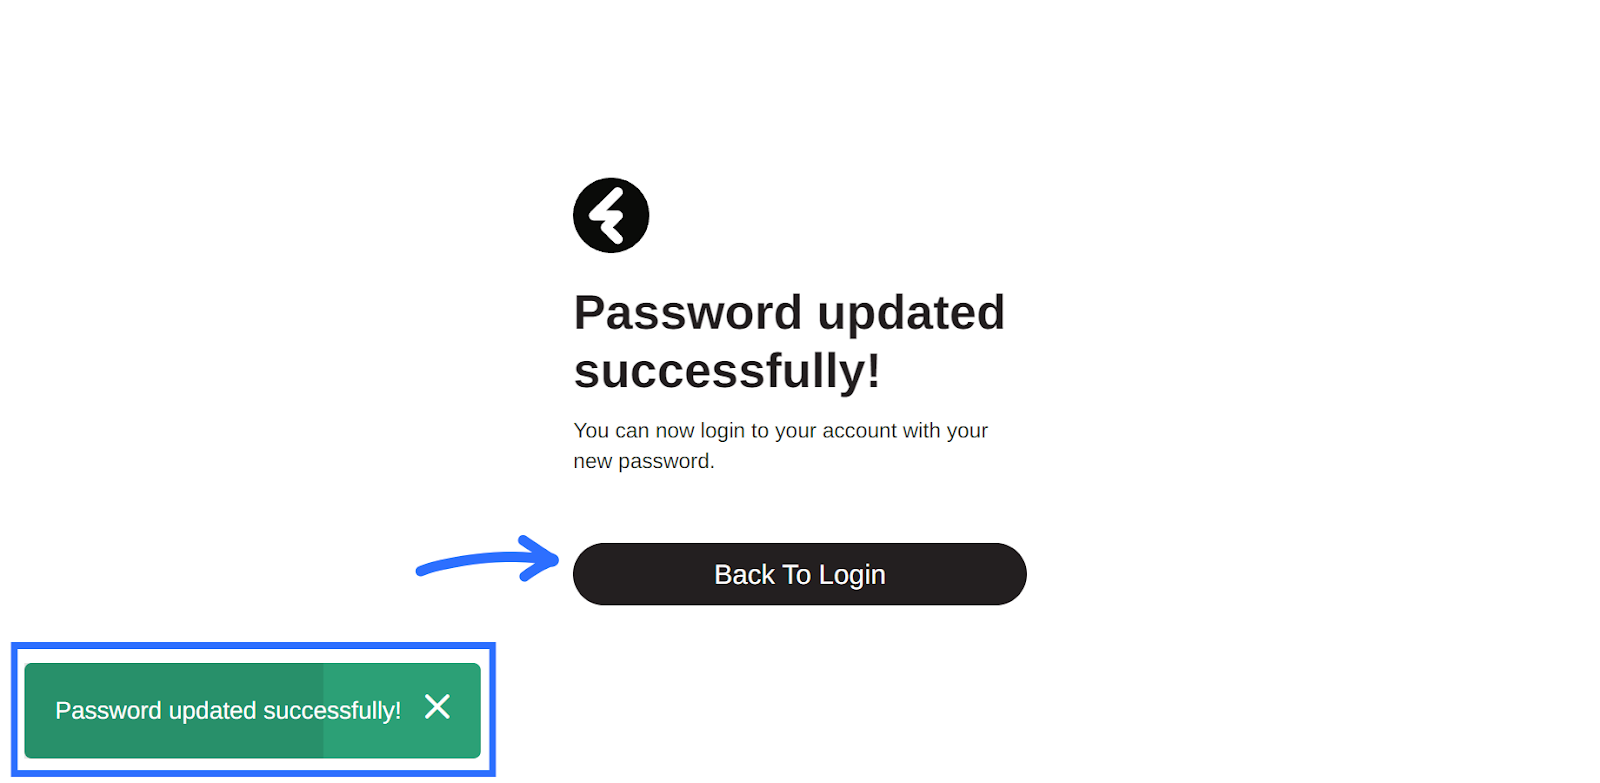
Once you’ve selected a password which meets all the requirements, type the exact same password into the Retype your password section and then click Next. You’ll be brought to the Password updated successfully! Page, and a green pop up will confirm that your password has been successfully updated. Click the Back to Login button here to return to the login screen and sign in using your new password.
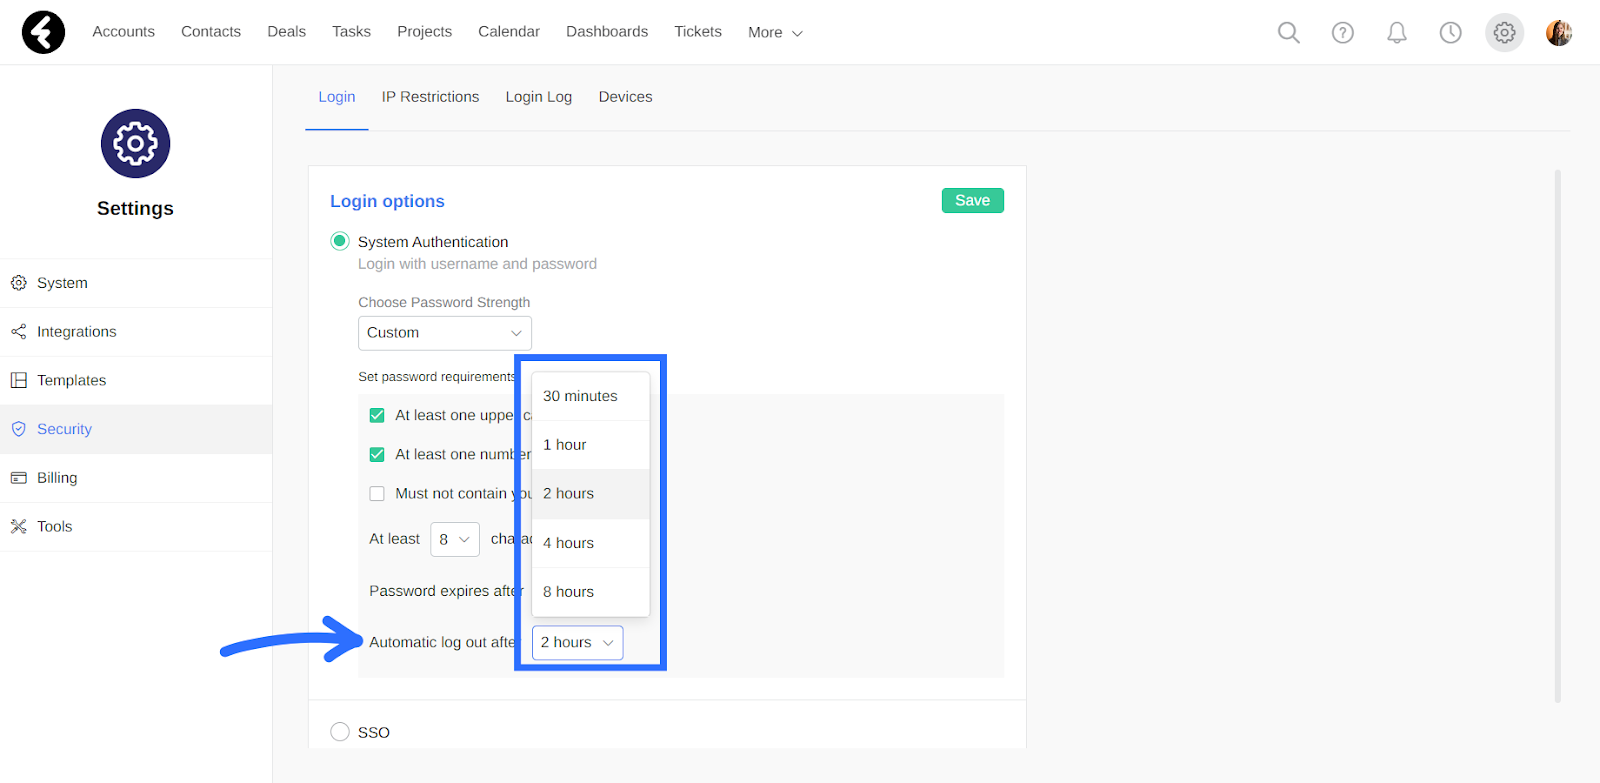
Automatic log out
The last System Authentication setting you’ll find is the Automatic log out after option. This will set the amount of time the system will wait before automatically logging out of the system if a user is inactive. For example, if the selected option is 1 hour, then system users will be automatically logged out of the system after an hour of inactivity. In the Custom option, you can use the Automatic log out after dropdown to select the specific time frame you’d like.
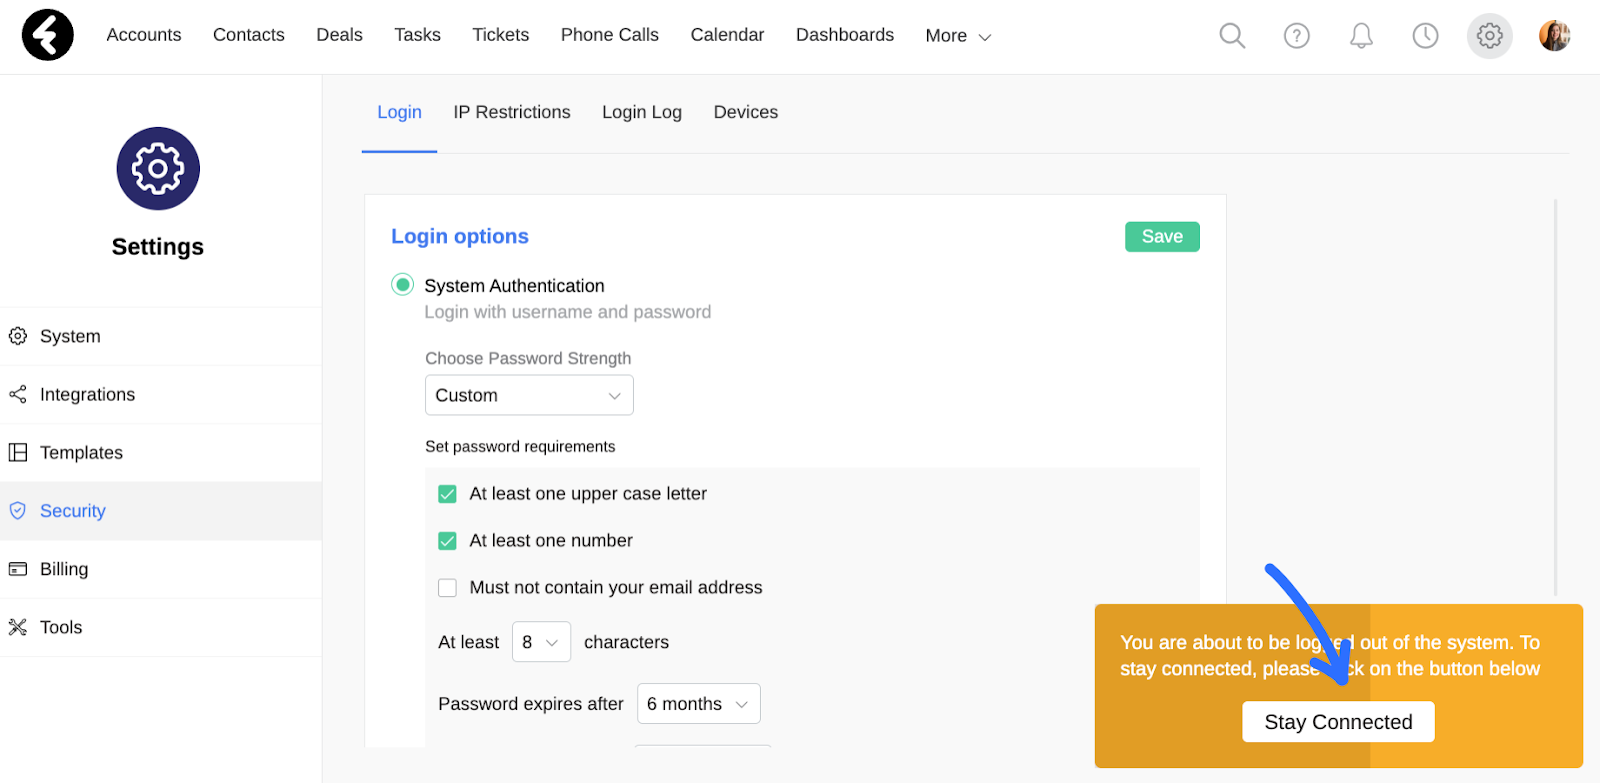
If no actions are taken within the selected time frame, an orange popup will open on your screen. You can click Stay Connected here to remain logged into your system. If you don’t, after a few seconds the popup will disappear and you’ll be logged out of the system.
IP Restrictions
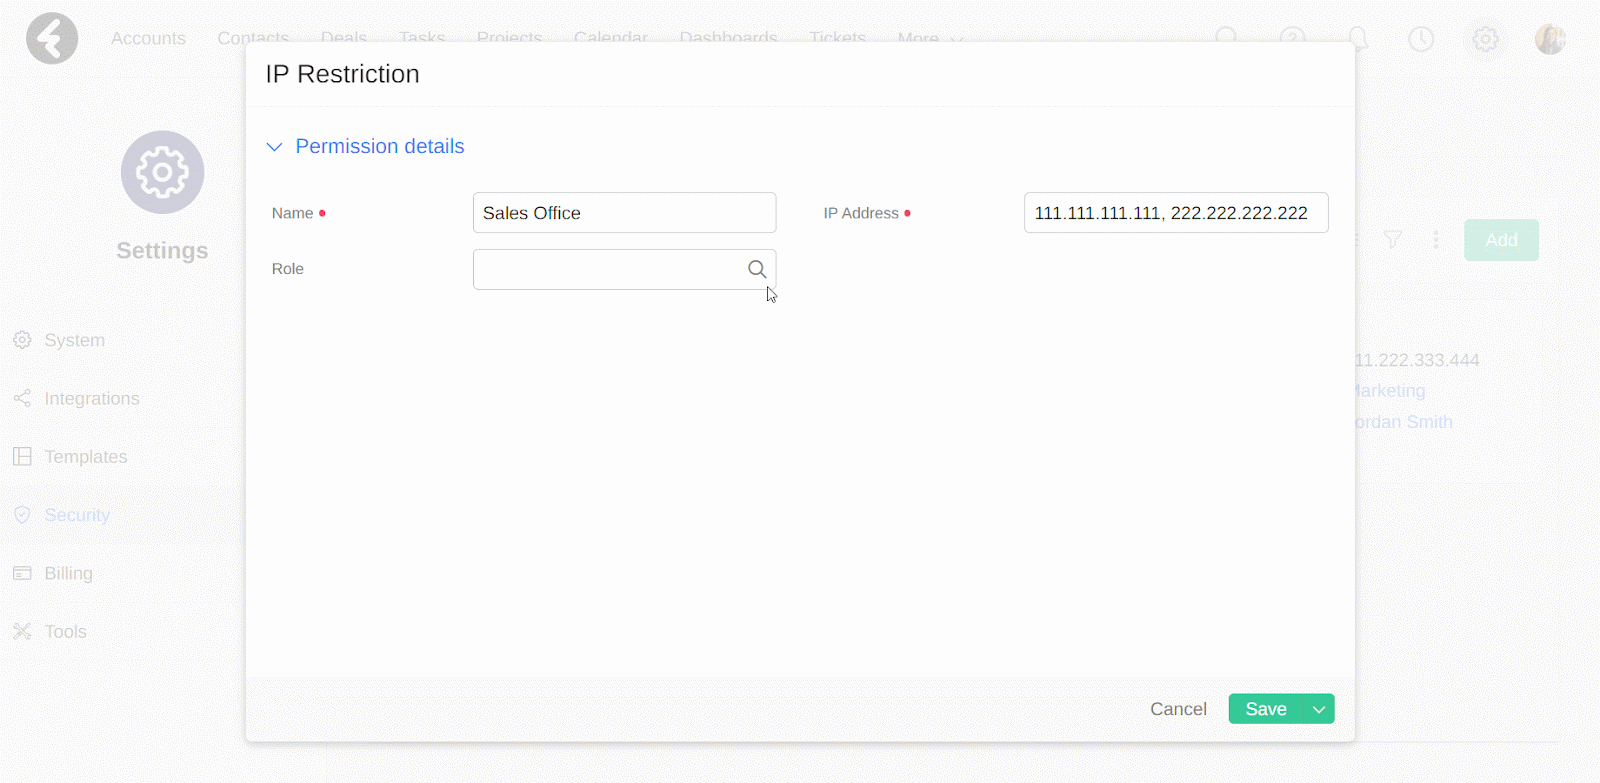
By setting up IP restrictions you can add an extra layer of security to your system. You can select exactly which IP addresses are allowed to log in to your system, and choose which user roles these restrictions will apply to. For example, you can set that your sales reps are only able to access your system when they’re connected to your office’s IP address. To set this up, first go to the IP Restrictions option and then click the Add button.

This will open a form where you can set the details for your new IP restriction. Set the Name field as a name which will help you identify the purpose or placement of this restriction, such as “Sales Office”. Next set the IP Address and Role fields, which are explained below.
IP Address
In the IP Address field you can set the IP address which you’d like to allow access from. For example, if you put the IP address “111.111.111.111”, then only users who are connected to this IP address will be able to connect to the system. You can add more than one IP address in this field to provide access from multiple IP addresses. Simply separate each IP address with a comma, such as setting this field’s value to “111.111.111.111, 222.222.222.222, 333.333.333.333”. Now users can sign in from any of the listed IP addresses.
Role
This is a lookup field to the roles in your system, which you can learn how to manage here. By setting a role in this field, your IP restriction will only apply to the role you select. Continuing the above example, by selecting the Sales Rep role here, only users who are assigned the sales rep role will have to sign in from the set IP address. All other users will not need to meet the IP requirements, assuming they do not have their own IP restrictions.
After setting up your IP restriction, be sure to click Save to save and activate it. Its page will open, where you can use the form and stream like in any other record. By going back, you’ll see your new restriction added to the list in the IP Restrictions view. You can edit this view and add new ones just like you can with any other editable system object; learn more here.
Unauthorized IP addresses
If a user is trying to log in from an unauthorized IP address, they’ll receive the error “User login blocked from this computer, Please contact your system administrator for more details”. If you see this error and believe you are using an authorized IP address, reach out to an administrator from your organization. If you are an administrator and have blocked the access to your system, reach out to support@fireberry.com or submit a ticket here.
Login Log
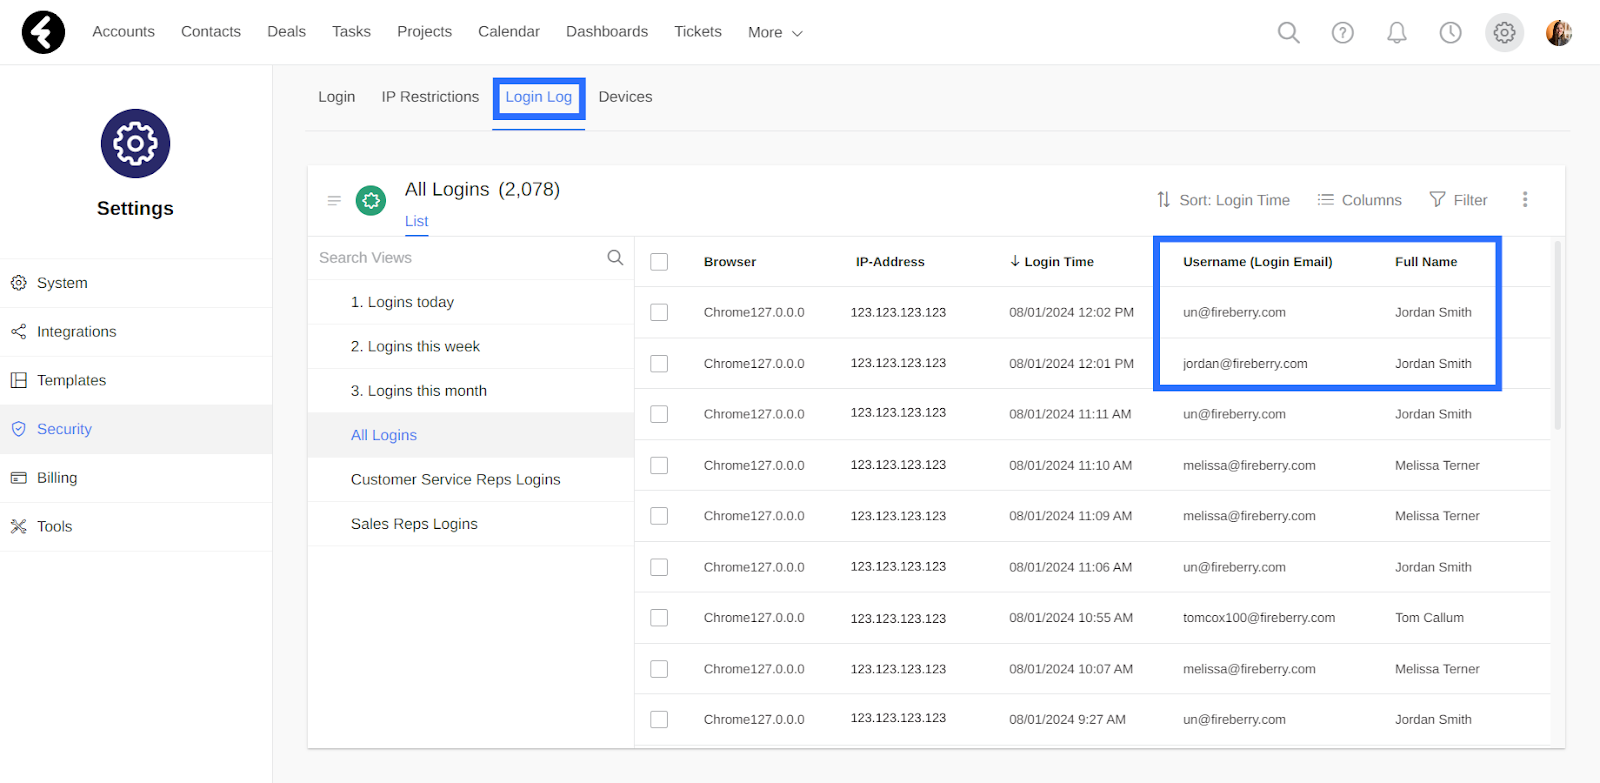
Open the Login Log section to see a list view of all the logins to your system. Each row here represents a single time that a specific user logged into the system. You can use the columns to see the name and username of the user, the time they logged in, the browser they logged in from, and the IP address they were using at the time.
The Username (Login Email) field will contain the username of the user at the time they logged into the system, so that if a user has changed their username you may see multiple entries with the same user’s name but different usernames.
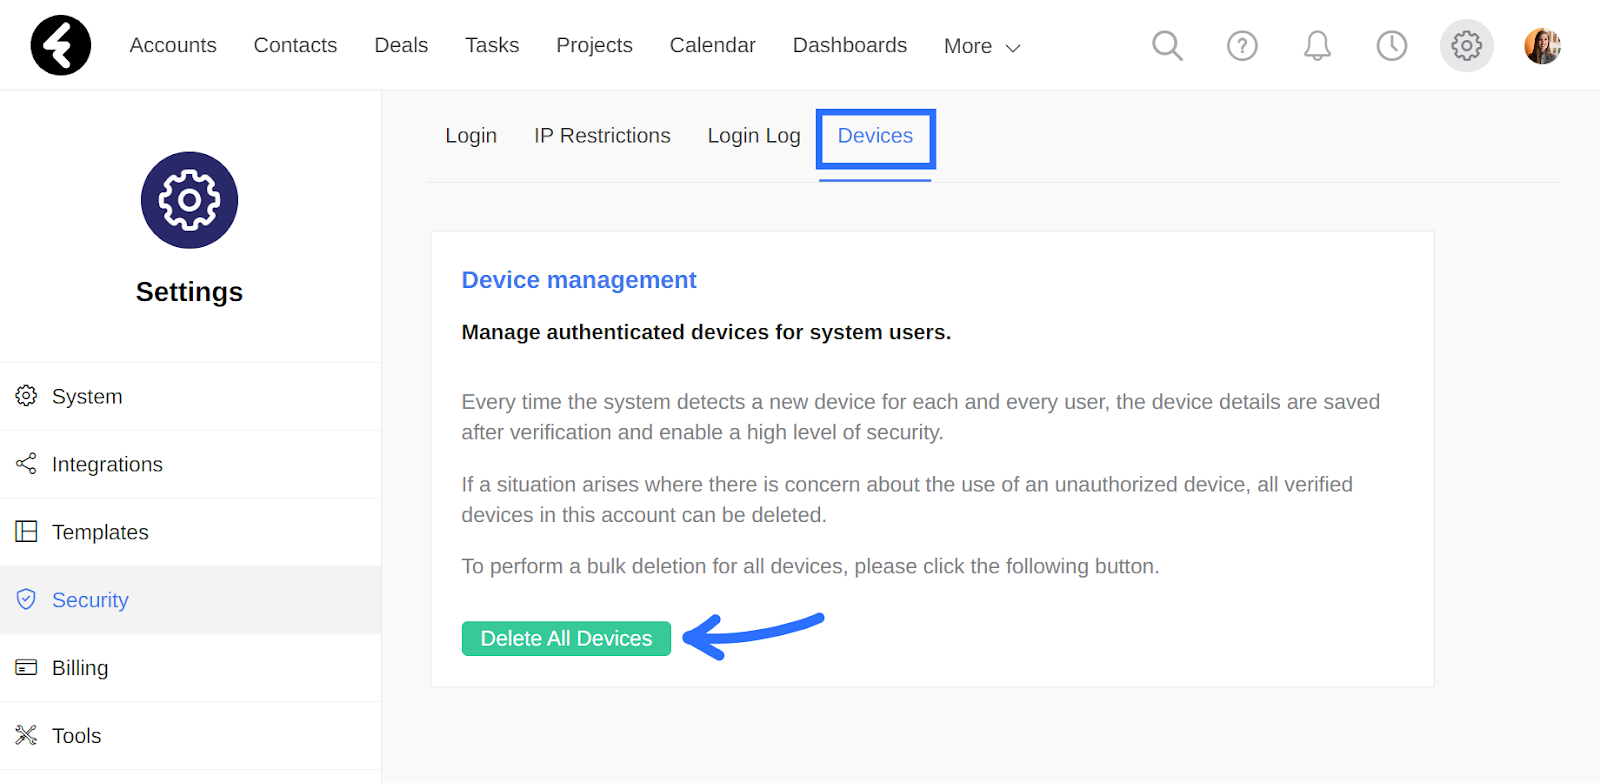
Devices
The devices tab provides additional security to the device verification feature, which you can learn about here. By clicking the Delete All Devices button, you’ll delete the verification for all the devices of all the users in your system. This is useful if you’re concerned about unauthorized devices.